


Sewing a Himekaji Pink Bunny Toile Skirt DIY Tutorial
In just a single day, I sewed this extremely cute and pretty skirt in a dusty pink color and classical, vintage-looking print – I thought it would be perfect for wearing on Thanksgiving!
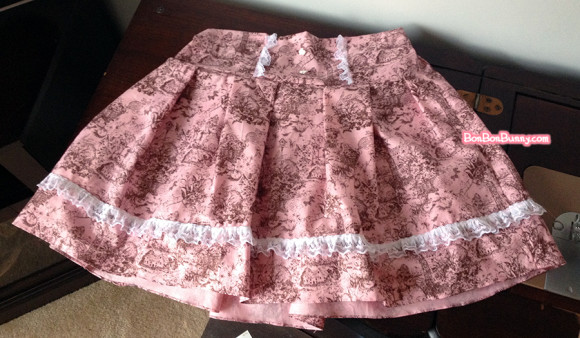
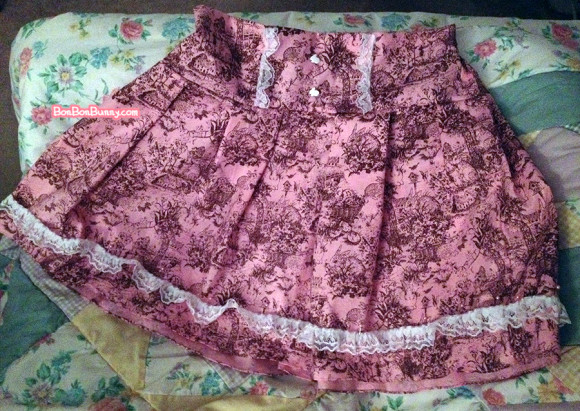
Here is the finished skirt!!
It has a high waist and is incredibly full in shape.
–
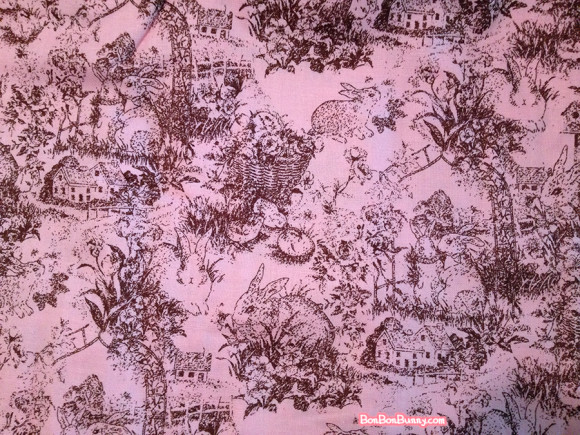
This is a close-up of the fabric –
a classical-looking toile print covered in BUNNIES!!
From afar, you can hardly tell that there are bunnies there at all.
They are secret bunnies.
–
Now I’ll let you know how I made it!!
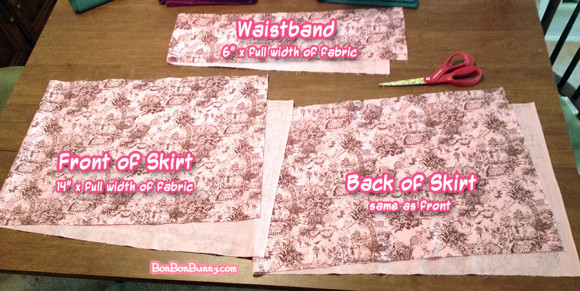
These three incredibly simple, rectangular shapes are all you need to cut out.
Cotton fabric comes in aboout 45″ wide, folded at the middle.
For rectangular pieces like these, all you do is measure the length down for each piece
and cut allllll the way across that 45″-ish width.
Using twice the amount of length that the waistband has
is what makes the skirt so fluffy and full!!
I like this method more than making a circle skirt pattern,
because the entire cut of fabric gets used without ANY scraps,
AND you don’t have the problem where your print is upside down at the back.
–
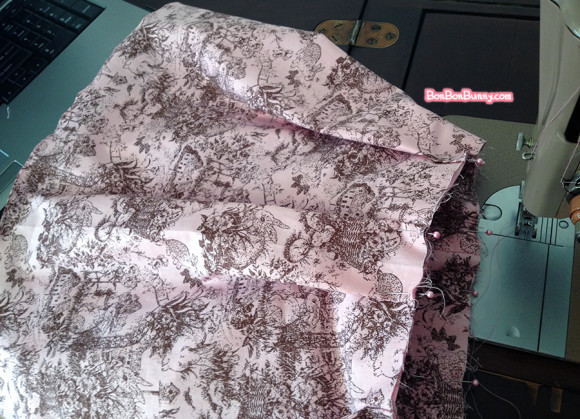
The front & back panels get seamed together to make one huge “tube”-like shape,
then hemmed along the bottom.
In the above picture, I’m using lazy box-pleat-like gathers to match up the width
of the front + back skirt pieces with the waistband.
However, I do not iron the box-pleats down,
because I want it to fall like ruffles and not actual pleats.
Oh, and I always sew wrong-sides-together first, since I use French seams all the time
so that all of the seams are extremely sturdy and finished-looking on the inside.
–

Here is the “after” of the above picture – the waistband
and the two skirt panels all attached!!
The waistband is about to be folded over at the top,
with a channel for elastic to go through ONLY on the back.
The front will be laying flat – that’s what gives it the high-waisted skirt appearance!
You can also see in this picture that while I am spending all of these hours sewing,
I keep myself entertained by watching Youtube vids of video games. :p
For this particular project, it was the Best Friends playing Super Mario RPG.
–
In just one afternoon, I had finished practically an entire skirt!!
The lace details are simple – just lengths of lace sewn on in easy straight lines.
Actually, in the above pic, the bottom row of lace is pinned on
and not actually sewn yet.
The buttons are sen on by hand. By the way –
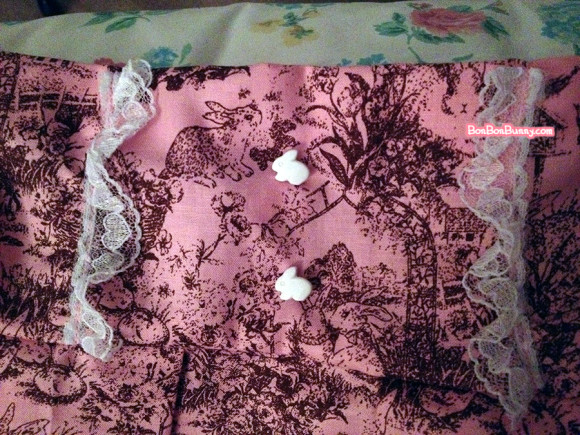
Look at these tiny bunny buttons!!!
–
Since I took a little break after making so much progress in the above pics,
it gave me time to decide that I wanted to scoot the bottom row of lace
up by a couple of inches before finally sewing it in place.
Stepping back for an hour (or day) is usually so beneficial!!
I’m so excited to have something this classical-looking and cute.
It looks like something that Liz Lisa would produce, and I never thought
that I’d own anything as pretty as anything of theirs.
I’m so excited to wear this for Thanksgiving
and any other coords I want to create with it!!
Monday, November 23rd, 2015 3:00 pm
Tags: bunnies, bunny, gyaru diy, gyaru sewing, himekaji, pink, roma gyaru, sewing tutorial.
Subscribe to the comments feed if you like.
You can leave a response, or trackback from your own site.
October 23rd, 2016 at 1:29 pm
It’s so cute!! You are really talented